You can add documents, surveys, videos, presentations, and more the way you see fit within courses. Let's learn how.
There are 3 ways to add a given asset to a course:
-
From the Media Library: This option is helpful if you're looking to upload multiple assets at the same time.
-
From the Syllabus Builder: If you have a single asset you'd like to add to a specific course activity, use this option to upload the document directly from the Syllabus Builder. Documents uploaded using this method will also be automatically available in the Media Library.
-
Using an Embed Code: If you have an embed code for the document you wish to add, use this method.
Step 1
Go to Content in the navigation tab and select your desired course, or start fresh by creating a new course.
Everything created/added from this point is saved as a draft and is not visible to learners until Publish is clicked.
Step 2
Click Add Activity. Select the content type your activity will be from the following choices:
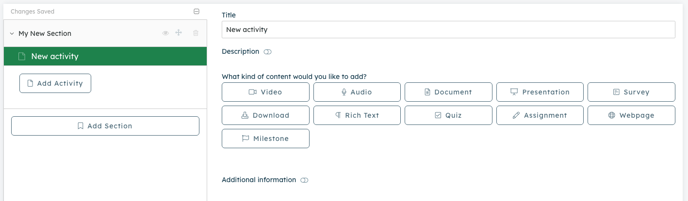
Step 3
Based on the activity type, you'll be prompted as follows:
Video, Presentation, Document: add the media asset through the Media Library, computer upload, or embedded code. Learners will be able to view PDFs, Powerpoint Presentations, or videos easily within their courses through this activity type.
Survey: Add a URL to be embedded within your course from TypeForm, Google Forms, Survey Monkey, or wherever you normally create surveys. We'll fetch the survey data and embed the survey within your course directly.
Download: Upload a training manual, policy handbook, yearly report, or any other important documents you want learners to download and retain for future review. Simply upload the file to Northpass in the activity and learners will be presented with instructions to download the document within the course.
Rich Text Editor: Add a multitude of different content types within the Rich Text Editor, or RTE. This includes tables, embedded code, images, or customized text. The unique flexibility of the RTE allows you to control what your learners experience within this activity type.
Quiz: Make sure learners are retaining important information and ensure compliance by adding a quiz. You'll first need to create quizzes within your school, which you can learn all about within our Quiz Documentation.
Assignment: Back to basics, it's time to hand in your assignment! With this activity type, learners will need to complete and submit an assignment, which you can then review within the Assignments Submitted Report. If you need to create an assignment, you can click here, or find Assignments within the Content tab of your Navigation Bar.
Webpage: Embed a webpage you'd like learners to experience without leaving their course by adding the URL right within the activity.
Milestone: With multiple activities within a course, you'll want to verify learners are completing each one before continuing through the course. Add a milestone after a quiz, for example, to ensure that learners score a minimum of 90% to pass. You can also add milestones to a video to verify learners are watching a specific amount of the video before continuing forward. This is an important feature, to read more about what milestones are and how to add them, click here.
SCORM: Select from one of the SCOs (Sharable Content Objects) within your available SCORM packages from the drop-down menu.
Step 4
Click “Publish” to make your changes live.
Changes to edited/added content are distributed to the learners by clicking “Publish”. Once Published changes go live and can be seen by the learners.
